Bathroom vanity height should tell you where the countertop and sink rim will finish above the floor. A cabinet height alone cannot do that. The countertop adds height, a vessel sink adds a raised rim, and a floating cabinet also has a mounting position to account for.
US guides often describe traditional vanities around 30–32 inches high and taller “comfort height” arrangements around 34–36 inches. Use those labels to find candidates, then check the measurement's endpoints. They are market conventions, not a universal ideal for every user or bathroom.
Separate the Three Heights
Start with a vertical section: a drawing showing the assembly from the side as though it had been sliced through. Mark the finished floor, the top of the countertop and the top of the sink rim. These are the reference levels you need to compare.
Countertop height is the vertical distance from the finished floor to the usable top surface. Sink-rim height is the distance from that floor to the upper edge of the sink. Cabinet height describes the cabinet itself; the drawing must say whether its legs or base are included.
A backsplash rises behind the countertop and does not set the washing height. Likewise, the highest point of a faucet is not the height of its water outlet. Keep these separate when reading a product's overall-height field.
See How the Sink Changes the Result
An undermount sink attaches below the countertop. Its bowl hangs into the cabinet, so you do not add the bowl's full height above the counter. The countertop remains the upper surface at the front of the assembly.
A drop-in sink rests on the countertop by its rim. That rim can project above the surface; check the actual section rather than treating it as exactly flush. An integrated sink and top form a combined unit, whose drawing defines the relevant surface and rim levels.
A fully above-counter vessel sink adds its installed projection above the top. This is the distance from the countertop surface to the upper rim. It is not the bowl's interior water depth. If the installation includes a mounting ring or pad, its effect belongs in that projection too. Measure the installed rise to the rim rather than adding the loose bowl height and then counting the same mounting parts again.
Some sink designs permit partial recessing into the countertop. Only use that arrangement when the selected model's instructions allow it. Subtracting an arbitrary amount from a vessel's catalog height does not establish a safe recess or a suitable cutout.
Begin at the Finished Floor
Measure from the floor surface people will stand on after the work is complete. The subfloor, an unfinished floor-leveling layer and the top of existing tile are not interchangeable reference points.
Suppose a sink rim is 870 mm above an existing floor. If a new floor surface rises 12 mm and the vanity stays fixed at the same wall position, the rim becomes 858 mm above the new floor: 870 − 12 = 858. Raising the floor has reduced the measured use height. This hypothetical example is a reference-level calculation, not a flooring recommendation.
For a floor-supported vanity, establish whether it will sit on the finished floor or on another designed base. For a floating vanity, transfer the planned finished-floor level to the wall before marking the cabinet position. If the floor slopes, identify the reference point used in the design instead of measuring an arbitrary gap at one corner.
Add the Parts, Then Work Backward
For a floor-supported vanity with an above-counter vessel sink, use this relationship:
Finished sink-rim height = floor to cabinet support top + actual top buildup + sink projection above the countertop.
“Actual top buildup” means the vertical distance added above the cabinet's support surface by the installed countertop assembly. Include any specified underlay or mounting layer. A thick-looking decorative edge may hang down over the cabinet; its visible depth does not necessarily raise the top surface by the same amount.
Here is a hypothetical vessel-sink assembly. The cabinet's support top is 720 mm above the finished floor, the installed top adds 20 mm, and the sink rim projects 130 mm above that top:
| Height Item | Hypothetical Value |
|---|---|
| Finished floor to cabinet support top | 720 mm |
| Installed top buildup | 20 mm |
| Countertop height | 740 mm |
| Sink projection above countertop | 130 mm |
| Finished sink-rim height | 870 mm |
The calculation is 720 + 20 + 130 = 870 mm. These are demonstration values, not a recommended height or a real product combination.
If a design instead starts with an agreed 870 mm rim target, work backward: 870 − 130 − 20 = 720 mm to the cabinet support top. This lets you compare cabinet options without forgetting the bowl. If a listing's height already includes the countertop, do not add that top a second time.
Changing to a sink with a 160 mm installed projection raises the rim by 30 mm if everything else stays fixed. To retain the same target rim, the countertop would need to be 30 mm lower. Check whether that change is possible for the cabinet, plumbing and intended use before changing the specification.
Locate a Floating Cabinet from the Same Reference
With a floating vanity, there is another distance: the height from the finished floor to the cabinet bottom. Add the cabinet's own height to reach its support top, then add the installed top and sink projection.
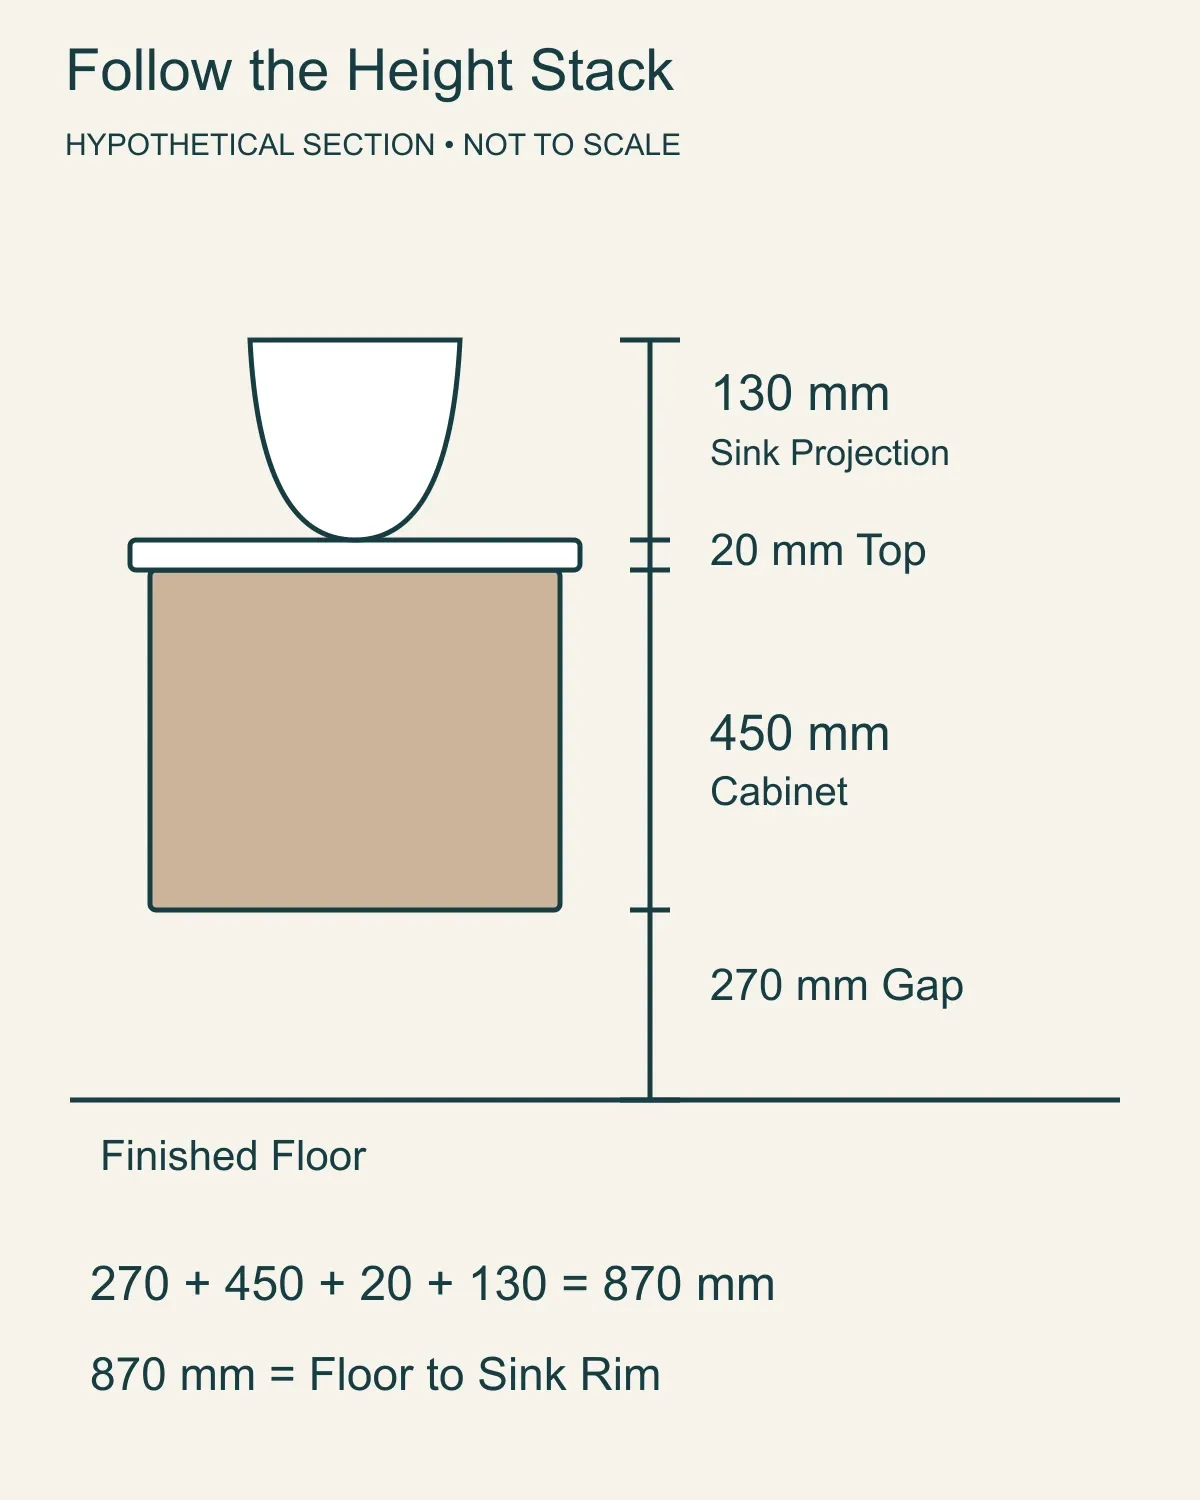
Using a 450 mm-high cabinet in the same hypothetical assembly gives:
Floor-to-cabinet-bottom height = 870 − 130 − 20 − 450 = 270 mm.
That 270 mm locates the cabinet bottom. It does not locate the screw holes or hanging rail. Read the installation drawing for the fixing points' positions relative to the cabinet. Use those dimensions to relate the fixing positions to the calculated cabinet-bottom height. The wall structure, fixing system and pipe positions also constrain where the unit can go; a floating design does not make every height possible.
A change in countertop construction or sink model can therefore alter the cabinet mounting position. Resolve those parts before the wall is closed and before the installer transfers marks from a drawing.
Choose a Target for the People and the Task
The arithmetic tells you the resulting height, not whether it suits someone. Start by observing a sink the intended users already find comfortable. Record its rim and countertop levels, the distance from the front edge to the bowl, and whether they can reach the controls comfortably.
Then try the proposed arrangement with a full-size mock-up. Test handwashing, face washing and reaching the faucet, as relevant. Raising a rim can reduce bending for one person while making reach harder for another. A deep countertop or a large front ledge can also make a sink harder to reach even when its rim height is unchanged.
For a shared bathroom, include shorter users and anyone who expects to sit or approach in a wheelchair. A taller vanity is not automatically a suitable aging-in-place choice. A mock-up can reveal usability problems, but it cannot certify an accessible design.
Where US ADA requirements apply, the general height rule in Section 606.3 measures to the front of the higher of the rim or counter surface, with a 34-inch maximum. The rule has scoped exceptions, including a lavatory (handwashing sink) serving a single-occupant facility accessed only through a private office and not used by the public or in common. Applicability and exceptions need project-specific review.
Height is only one part of that review. Approach space, knee and toe clearance, control reach and operation, and protection from exposed pipes also matter. A cabinet at or below 34 inches does not, by itself, establish compliance. For projects elsewhere, use the requirements applicable to that destination rather than importing a US “ADA height” label.
Coordinate What Sits Above and Below
Once the countertop and rim levels are known, check the faucet's outlet height and reach against the bowl. A tall faucet may clear a vessel but place water poorly; a wall-mounted outlet must also be coordinated with the actual bowl and finished wall surface. There is no single faucet-to-rim gap that proves every combination will work.
Position mirrors and lights around the users and the selected fixtures, rather than copying a fixed distance above the cabinet. For a mirror cabinet, test whether its door clears the faucet when opened. Inside the vanity, check the bowl, drain and trap against drawers and the intended pipe connections. Lowering the cabinet does not move existing wall pipes with it.
Keep a short height record with the final design: finished-floor reference, floor-to-cabinet support top, actual top buildup, sink mounting method, rim projection and resulting rim level. Add the installation drawing revision for a floating cabinet. Those entries make a height change visible before it becomes a mismatch on site.
For width, depth and the complete room footprint, see the Bathroom Vanity Dimensions Guide.