Bathroom vanity dimensions describe more than the width of a cabinet. To see whether a vanity fits, compare the cabinet, the countertop and the sink separately. Then check the space people and moving doors need around the complete assembly.
A nominal 36-inch vanity is a useful shopping category. It does not tell you the exact countertop width, the sink opening or the space left inside for drawers and plumbing. This guide explains how to turn those separate measurements into a layout you can compare with your bathroom.
Start with Three Sets of Dimensions
In US retail guides, common vanity widths include 24, 30, 36, 48, 60 and 72 inches. Cabinet depths around 18 or 21 inches also appear in manufacturer ranges. These are starting points for finding products, not universal standards or evidence that a particular combination will fit.
Read what the listed dimensions include. A cabinet-only listing and a vanity sold with a top can use the same nominal size while having different outside measurements. Metric products may follow different size increments; converting 36 inches to 914.4 mm does not turn it into a 900 mm cabinet.
| Component | Dimensions to Find | Why They Matter |
|---|---|---|
| Cabinet | Actual width, depth and height; fronts, handles, legs or plinth included or excluded | Defines the cabinet footprint and moving parts |
| Countertop | Finished width and depth, thickness, overhangs and backsplash | Often sets the assembly's widest or deepest fixed edge |
| Sink or basin | Outside and bowl dimensions in plan, full vertical size, mounting method and cutout template | Determines the opening and the space needed above and below the top |
For a cabinet, depth runs from back to front. For the sink, also check the vertical section showing how far the body and drain extend below the top.
The plinth is the base beneath a cabinet that closes the space to the floor. A backsplash is the upright surface behind the countertop. Its height is not the working height of the vanity.
For height, distinguish the floor-to-countertop measurement from the floor-to-sink-rim measurement. An undermount sink sits below the top; a vessel sink projects above it. A floating cabinet's own height excludes the gap beneath it. Those differences explain why cabinet height alone cannot describe the finished washing position. The Vanity Height Guide develops the height calculation.
Read the Sink Drawing Before Judging the Fit
A sink has an outside footprint, an interior bowl and an installation opening. These are different boundaries. The opening must leave the support and mounting space required by the selected sink and countertop system.
For example, a published US/Canada specification sheet for the Kohler Ladena K-2214 shows an outside plan size of 20-7/8 by 14-3/8 inches. Its bowl area is listed as 18-5/8 by 12-1/4 inches, and the sheet calls for a separate cutout template. This is an illustration of how to read a drawing, not a current ordering specification or a template for another sink.
The countertop fabricator is the business that cuts and finishes the top. Neither the outside dimensions nor the bowl dimensions tell that business exactly where to cut. For an undermount sink, the countertop edge may expose or cover part of the sink rim according to the approved detail. The sink's mounting hardware also needs room below.
Bowl water depth is not the same as the full depth of the sink body; the drain connection extends farther down. Obtain the current template for the exact model and mounting arrangement before fabrication. The Vanity Specification Guide explains how the sink, faucet, top and drain interfaces fit together.
A shallow cabinet needs a compatible sink layout, not simply a smaller-looking bowl. Check the front edge, space behind the sink for the faucet, and room underneath for the bowl and mounting parts. A faucet mounted through the countertop occupies space that a wall-mounted faucet does not, but the latter needs its own wall and pipe coordination.
Draw the Complete Footprint
Measure from finished surfaces: the wall face after tile or other finishes, and the floor surface that will remain in use. If those surfaces are unfinished, label the measurements as preliminary and account for their planned buildup before approving the final fit.
Draw the countertop as well as the cabinet. Overhang means the countertop extends past the cabinet; it may differ at the front, sides and back. Do not assume an overhang on a side intended to meet a wall.
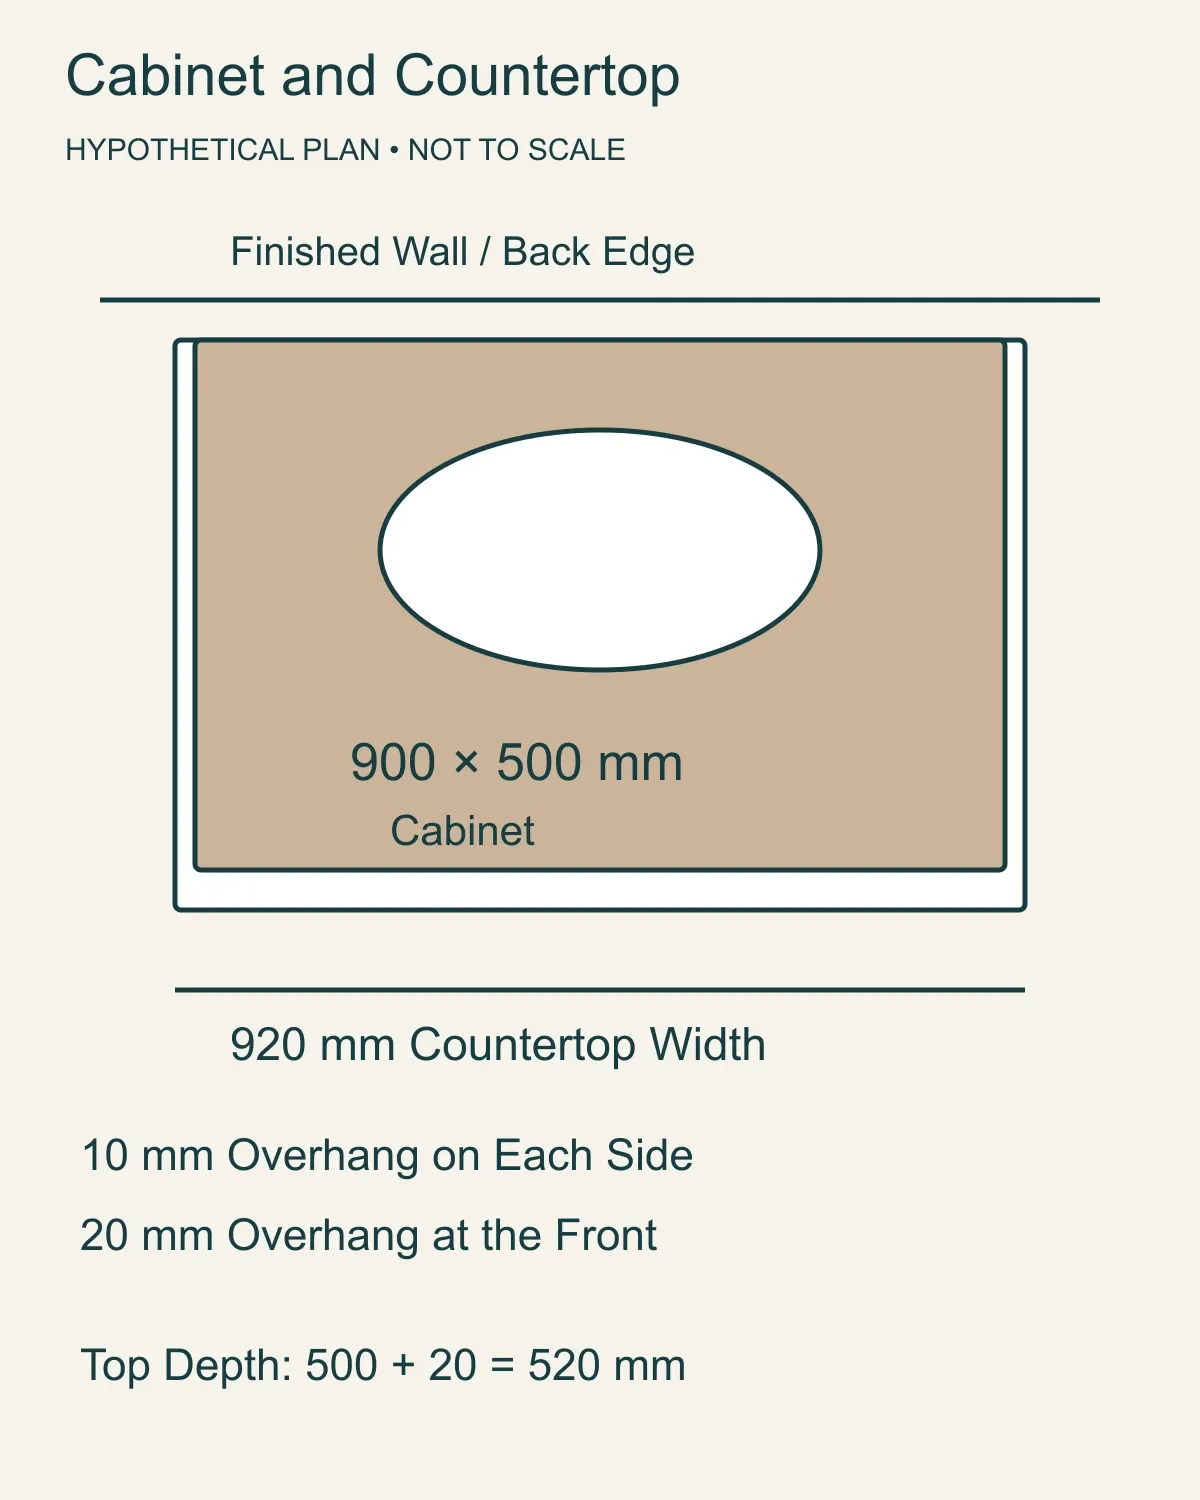
In this hypothetical example, the cabinet is 900 mm wide and 500 mm deep. The countertop extends 10 mm beyond each side and 20 mm beyond the front, with its back edge at the finished wall:
-
Countertop width: 900 + 10 + 10 = 920 mm.
-
Countertop depth: 500 + 20 = 520 mm.
-
In a 950 mm finished opening, the countertop leaves 30 mm total across the two sides.
That 30 mm is a remaining space, not an approved installation allowance. Wall irregularity, side fillers, a backsplash along a side wall and the manufacturer's fitting requirements can use it up. A side filler is a fitted strip that closes a gap between the cabinet and a wall; it can also keep a door or handle away from that wall. Its size belongs in the layout rather than being added after the cabinet is ordered.
Measure an alcove at several positions and heights. A width taken only at the front can miss a narrower rear wall. Check whether the cabinet can be moved into position, not just whether its final rectangle fits.
Choose One or Two Sinks by Use, Not Width Alone
A wider vanity can provide more clear countertop space, a second sink or more storage. It does not automatically provide all three. Two sinks take up countertop area and create two sets of bowl and drain spaces below.
Compare a proposed single- and double-sink arrangement on the same countertop outline. Mark each bowl's actual size and centerline, the faucets and the clear surfaces where users would put a toothbrush cup or other everyday items. Then consider whether two people really need to wash at the same time and can stand at the bowls without crowding each other.
Common US double-sink shopping sizes include 60 and 72 inches, but the width label is not a comfort test. A large bowl, wide raised rim or closely spaced sink centers can leave less usable surface than expected. A single sink on a wide cabinet may be the more useful arrangement when counter space matters more than simultaneous use.
An offset sink can preserve a bank of drawers, but only if its bowl and plumbing fit the intended compartment. Check the internal drawing rather than assuming that every drawer shown on the front is full depth.
Check the Space That Changes During Use
The fixed footprint is only the first test. Mark the bathroom door swing, the shower door or screen, nearby fixtures and the vanity's fully open doors and drawers. Handles can project farther than the countertop, especially when a door opens toward a side wall.
A drawer may technically open while leaving no place for someone to stand and reach inside. Test those movements with a taped outline or a simple full-size mock-up. Include the user's position and normal route through the room. This helps assess daily use; it does not establish compliance with local clearance or accessibility requirements.
Inside the cabinet, the sink bowl, drain outlet, trap and water valves all compete with storage. The trap is the curved drain fitting that retains water to limit sewer gas entering through the drain. Access is needed to operate the valves, check joints and remove serviceable parts. An apparently empty rear corner is not useful storage if it must remain accessible for those tasks.
Plot the existing pipe locations from the same finished wall and floor references as the cabinet. A centered sink does not guarantee that an existing drain lines up with the available plumbing compartment. Have the installer compare the proposed internal layout with the actual connections before altering drawers, rails or cabinet panels.
Measure in an Order That Prevents Rework
-
Sketch the finished room, including door swings, trim and nearby fixtures.
-
Record the available width and depth at more than one point, plus the finished floor reference.
-
Add the actual cabinet and top outlines, including fillers, backsplashes and handles.
-
Place the selected sink and faucet using their drawings; check below the top as well as above it.
-
Test open doors, drawers, user positions and access to valves and the trap.
Keep the component model numbers and drawing revisions beside the sketch. If a top is included in a quotation, establish whether the sink, cutouts, backsplash and faucet are included too. “Vanity set” describes a package; it does not reliably identify every part in it.
You can now eliminate combinations that plainly conflict with the room and identify the measurements still needed for the shortlist. Final fabrication and installation require the selected products' current drawings, actual site dimensions and the applicable local design requirements. The useful result is a coordinated layout, with each remaining question attached to a specific part or movement.
Compare Floating and Freestanding Vanities when support, cleaning and installation scope are the next questions.