SPC flooring thickness is not a single quality grade. A quote may give the whole product thickness, the board thickness excluding its attached pad, or a loosely labeled “core” figure. The wear layer is another measurement, often stated in mil rather than millimeters.
Before comparing prices, identify what each number includes. Keep the wear layer, attached pad and installed floor build-up in separate fields. That makes it possible to compare the surface protection and finished height without counting the same layer twice.
Name the Measurement Before Comparing the Number
An SPC plank typically combines a surface treatment, clear wear layer, printed design, rigid core and, on some products, an attached pad. The treatment and wear layer are not interchangeable names for the entire top surface. A thin coating may affect scuffs, stains and cleaning while the clear layer beneath it protects the print from wear.
The rigid core gives the board its main structural body. Its formulation and connection profile matter as well as its thickness. The attached pad is a separate component below the board. It may change the product height and acoustic behavior without adding to the rigid core.
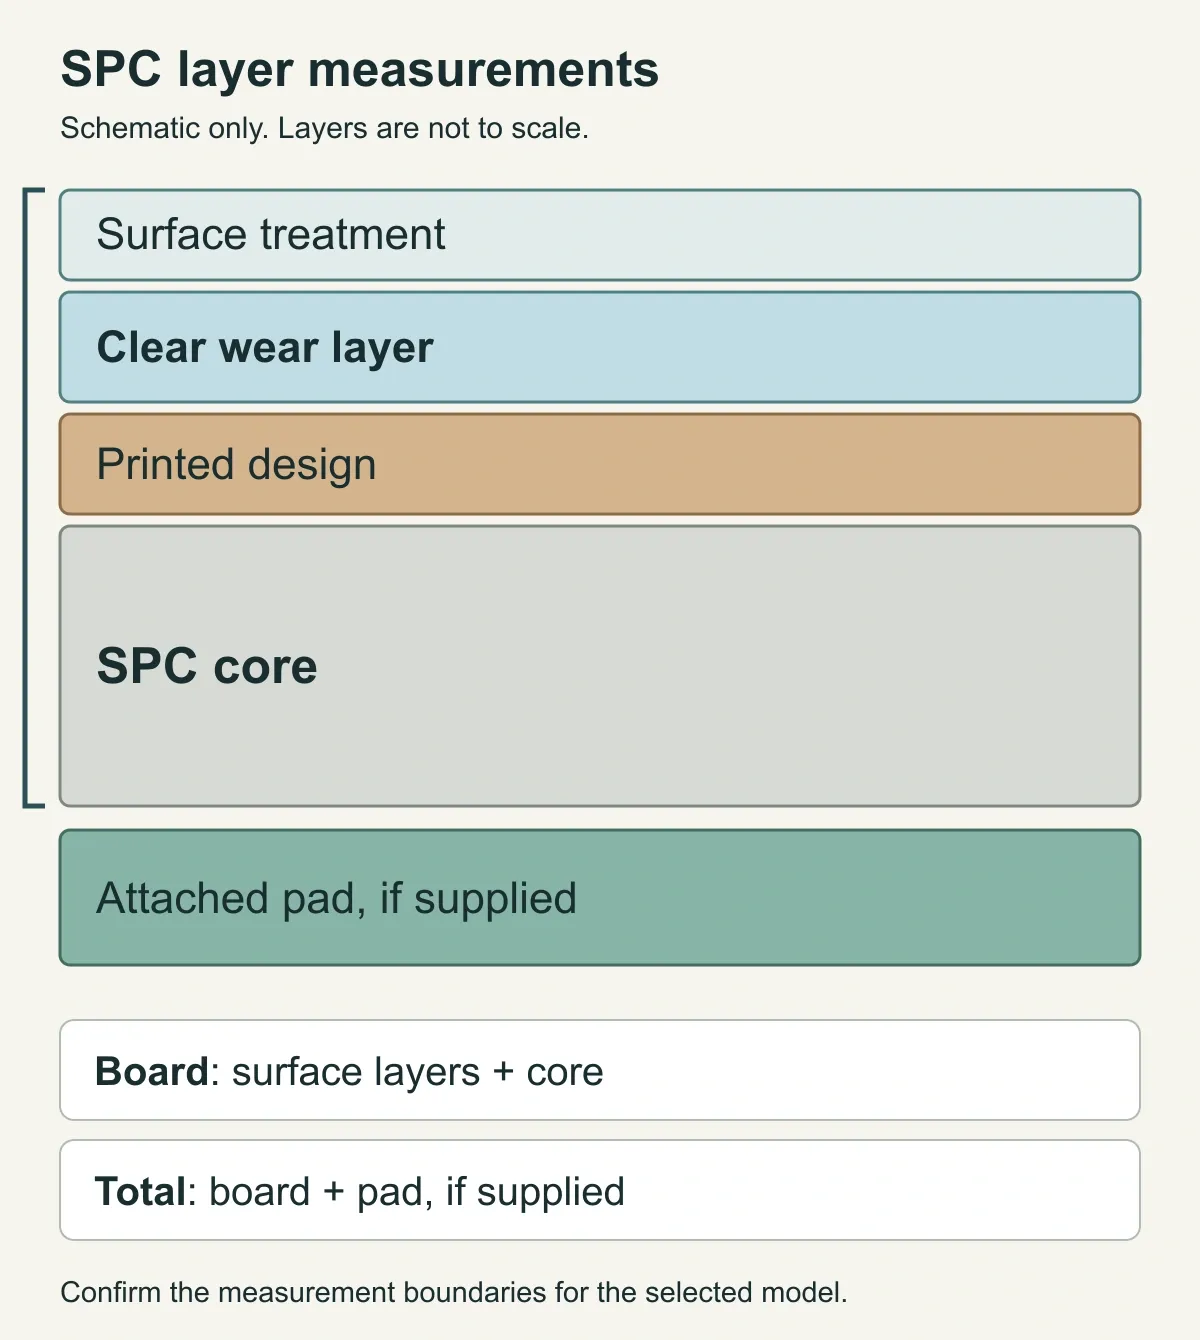
In this schematic, the board measurement includes the upper layers and rigid core. Total product thickness also includes the attached pad when present. The layers are not to scale and do not describe a particular model.
A supplier's term “core thickness” may not follow that distinction. It may mean the core alone or the whole board before the pad. A label such as “4 + 1 mm” therefore needs a written explanation of both parts. Subtracting the pad from the total does not automatically reveal the core-only thickness.
If the product construction itself is unclear, start with the SPC and LVP Construction Comparison. This guide deals with the dimensions of an identified product, not with choosing between unnamed vinyl categories.
Put Two Offers on the Same Basis
Here is a hypothetical comparison, not a George product schedule. Assume the supplier has confirmed that each board figure includes its wear layer and that each total includes its pad. In the table, nominal means the stated size rather than an exact measured value. The accepted measurement tolerance still needs to be agreed.
| Field | Example A | Example B |
|---|---|---|
| Board without attached pad | 4.0 mm | 5.0 mm |
| Attached pad | 1.0 mm | 1.0 mm |
| Total product thickness | 5.0 mm | 6.0 mm |
| Wear layer, as declared | 0.50 mm nominal | 20 mil nominal |
| Core-only thickness | Not separately stated | Not separately stated |
| Separate underlay | Not included; permission unresolved | Not included; permission unresolved |
The extra millimeter in B is in the board, not its pad. The wear-layer figures are close after unit conversion, but neither the thicker board nor the similar wear layer establishes equal performance. Surface treatment, joints, test scope and intended use still need review.
Do not add A's 0.50 mm wear layer to its 5.0 mm total. It is already part of the board. Likewise, B's 1.0 mm pad must not appear again as a separate installed layer after the 6.0 mm total.
The missing core-only figures need clarification if the project requires that measurement. They are not an invitation to estimate the print and coating thicknesses and subtract them. For a finished-height comparison, confirmed total product thickness is the relevant starting field.
Convert Mil and Mm Without Hiding the Original Claim
One mil is one-thousandth of an inch. It equals 0.0254 mm, not 1 mm. To convert a wear-layer value, multiply mil by 0.0254.
| Declared wear layer | Calculated millimeters |
|---|---|
| 12 mil | 0.3048 mm |
| 20 mil | 0.5080 mm |
| 22 mil | 0.5588 mm |
| 30 mil | 0.7620 mm |
For example, 20 mil × 0.0254 = 0.508 mm. Conversely, 0.50 mm ÷ 0.0254 is about 19.69 mil.
These calculations explain why 20 mil and 0.50 mm may appear as nearby nominal descriptions. They do not prove that two products have the same measured wear layer. Keep the supplier's original declaration alongside the converted value, then record the agreed tolerance and measurement basis.
Avoid turning a nominal 20 mil declaration into a new requirement of exactly 0.5080 mm with no tolerance. The conversion is exact; the supplied product still needs its own dimensional specification. If the quotation and technical sheet disagree, have the supplier correct the order documents before approval.
Choose Wear-Layer Evidence for the Actual Use
A thicker clear wear layer provides more material above the printed design when other construction details are comparable. It does not set a service life or prevent every kind of surface damage. Wear from repeated traffic, a scratch from grit and a dent beneath a loaded furniture foot are different problems.
The surface treatment can affect scratch, scuff, stain and cleaning behavior. A wear-layer thickness alone does not describe that treatment. Nor does a thick wear layer strengthen a weak connection or make an unsuitable pad acceptable.
Describe the project's use before setting the requirement. A quiet guest room, an entrance carrying grit and a workspace with rolling chairs place different demands on the floor. Record expected traffic, wheel or furniture loads and cleaning practices, then compare the proposed product's declared use and supporting results.
For wear-layer thickness, a measurement report can establish the thickness of the tested specimen under the stated method. An optical cross-section measurement examines the wear layer in section. A caliper reading across the complete plank measures overall thickness instead. Neither measurement by itself proves scratch resistance or projected years of use.
Record which sample was measured and which product it represents. A test on that sample does not show that every carton in a later shipment has been checked.
For a performance report, first check the product reference and test method. Then read the result beside its load or exposure conditions and any stated acceptance criterion. A report covering another construction or backing is not automatically evidence for the quoted product. A “pass” without its conditions leaves the important comparison unanswered. If the required evidence is missing, keep that requirement open rather than approving it from the nominal thickness.
A longer commercial warranty is also not a substitute for those details. Read the permitted use, exclusions, maintenance requirements and remedy. Do not turn a residential or light-commercial term into permission for every commercial setting.
Treat the Attached Pad as Part of the System
Pad thickness alone does not describe how it supports the board. The pad's material, density and how much it compresses under load can affect movement beneath the connections. A softer or thicker added layer can change that support, even if it makes the floor height match a neighboring finish.
Follow the chosen model's underlay instructions. Some systems already include a pad; another layer may be restricted or require specific approval. Do not add foam simply to turn a 5 mm product into a 6 mm assembly.
For sound control, obtain the report for the tested floor assembly and exact backing. The slab and ceiling also matter. For heating, have the responsible team check the permitted assembly and operating conditions. A pad described as acoustic does not establish either the project's sound result or heating compatibility.
Coordinate the Complete Finished Floor Level
Product thickness is only one part of the installed height. Preparation layers, retained finishes and any permitted separate layer can change the final level. Begin with a common reference level on the drawing so adjacent finishes can be compared.
Consider this hypothetical junction. Both areas begin at the same structural slab level. The example assumes the project's designer and installer have accepted the listed preparation and bonding layers.
The SPC side has 3 mm of preparation plus a 5 mm product, including its attached pad: 3 + 5 = 8 mm above the slab.
The tile side has 9 mm tile plus a 4 mm installed bonding layer: 9 + 4 = 13 mm above the same slab. The nominal difference is 13 − 8 = 5 mm.
Those are illustrative dimensions, not recommended installation thicknesses. A real detail must account for the surveyed base, actual installed layers, tolerances and the selected transition. A nominal pad thickness is not a precise prediction of its installed height under load. The Tile Selection Guide helps identify the neighboring material; it does not determine the bonding layer in this example.
Changing to a 6 mm SPC product would raise the SPC side to 9 mm if everything else stayed the same. The difference would fall to 4 mm, not disappear. That substitution may also change the required trim or clearance, so choosing the thicker board is not the same as solving the junction.
Have the designer and installer review door clearance, thresholds, cabinetry, appliance removal space and stair landings before ordering. Do not use extra soft underlay as an improvised leveling layer. A flooring change at the first or last stair tread also needs review against the project's stair geometry.
Record the Accepted Specification and Control Substitutions
Keep one dated record for the selected product. It should tell the next team what was accepted, what remains unresolved and which documents govern the choice.
-
Identity: manufacturer, product and color references, plank size, fixing system and document revision.
-
Dimensions: total thickness, what it includes, board and pad figures, wear layer in its original unit, conversion and agreed tolerances.
-
Evidence: reports covering the selected construction and use, installation and care documents, and the applicable warranty.
-
Interfaces: accepted finished levels, transitions and the drawing revision reviewed by the designer and installer.
-
Open decisions: missing information, the person responsible and what must happen before the material is approved.
Carry that record into the Project Procurement Checklist. If a substitute keeps the same color and total thickness but changes the board, pad or wear layer, reopen the affected checks. A matching headline dimension is not evidence of an equivalent assembly.
For available product categories, see Flooring and Staircase. To Request a Flooring Quotation, share room areas, the selected construction and finish, required documents, destination and timing. Include the floor build-up and adjoining-level drawings already reviewed by the project team.