A door rough opening is the receiving space in a wall before the door unit is fitted. It is normally larger than the door panel because it must accommodate the frame and the installation joint around that frame: the space between its outside edges and the receiving wall.
A familiar U.S. residential shortcut adds 2 inches to the leaf width and 2 1/2 inches to its height for certain prehung interior-door arrangements. That explains why a 30 × 80 in door may appear beside a 32 × 82 1/2 in rough opening in a guide. It is a starting convention for those arrangements, not a rule for every door.
To understand any opening chart, identify its starting measurement, the frame included and the floor reference. Those three details explain many apparent disagreements between tables.
Identify the Parts Before Reading the Numbers
The leaf or slab is the moving panel. A prehung unit includes a panel already hung in a frame. The vertical frame sides are the jambs, and the frame's top member is the head.
The frame stop is the surface the closed panel rests against, rather than a floor-mounted fitting that limits its swing. The structural member above a framed wall opening is the header. It is a different component from the door frame's head. In masonry or another wall system, identify the actual supporting and receiving edges rather than assuming the same timber construction.
| Dimension | What Is Measured | Why It Differs |
|---|---|---|
| Nominal leaf size | The size label assigned to the panel | It does not include the surrounding frame |
| Outside unit size | The assembled frame's outside edges | Includes frame components around the leaf |
| Rough-opening size | The receiving wall edges, using a stated base | Allows for the unit and its specified installation joint |
| Finished clear opening | The passage remaining in the open position | The open panel, stops and other obstructions occupy space |
A nominal dimension is a product size label. An actual dimension is the measured or specified finished size. When a chart starts with a nominal leaf, it has more to account for than a chart that starts with the actual outside unit.
For a broader explanation of these boundaries, see Standard Door Sizes.
What the Common “Add Two Inches” Shortcut Includes
The following table shows the arithmetic of the stated 2 in wider and 2 1/2 in taller shortcut. It is an illustration for that convention, not a manufacturer-specific construction chart.
| Nominal Leaf Example | Width Calculation | Height Calculation | Illustrated Opening |
|---|---|---|---|
| 30 × 80 in | 30 + 2 = 32 | 80 + 2 1/2 = 82 1/2 | 32 × 82 1/2 in |
| 32 × 80 in | 32 + 2 = 34 | 80 + 2 1/2 = 82 1/2 | 34 × 82 1/2 in |
| 36 × 80 in | 36 + 2 = 38 | 80 + 2 1/2 = 82 1/2 | 38 × 82 1/2 in |
The added width is not two inches of empty space beside an installed frame. Part of the difference is occupied by the frame itself. The remaining space is divided between the sides according to the frame's position.
The height addition also includes more than a gap above the panel. Frame construction, the panel's clearance above its base and the chosen floor or sill condition affect it. A guide assuming bare subfloor, the structural floor beneath the finish, can give a different height from one assuming a frame placed at finished-floor level.
This is why changing 82 in to 82 1/2 in without identifying the assumptions does not resolve a sizing question.
A More Useful Calculation: Leaf, Unit, Then Opening
Think in two stages:
Leaf → outside unit → rough opening.
In a hypothetical numerical example, a nominal 30 in leaf belongs to a unit measuring 31 5/8 in outside. Suppose that system calls for an opening 3/4 in wider than the outside unit.
-
The unit is 1 5/8 in wider than the nominal leaf.
-
The stated total installation space is another 3/4 in.
-
The opening is 31 5/8 + 3/4 = 32 3/8 in wide.
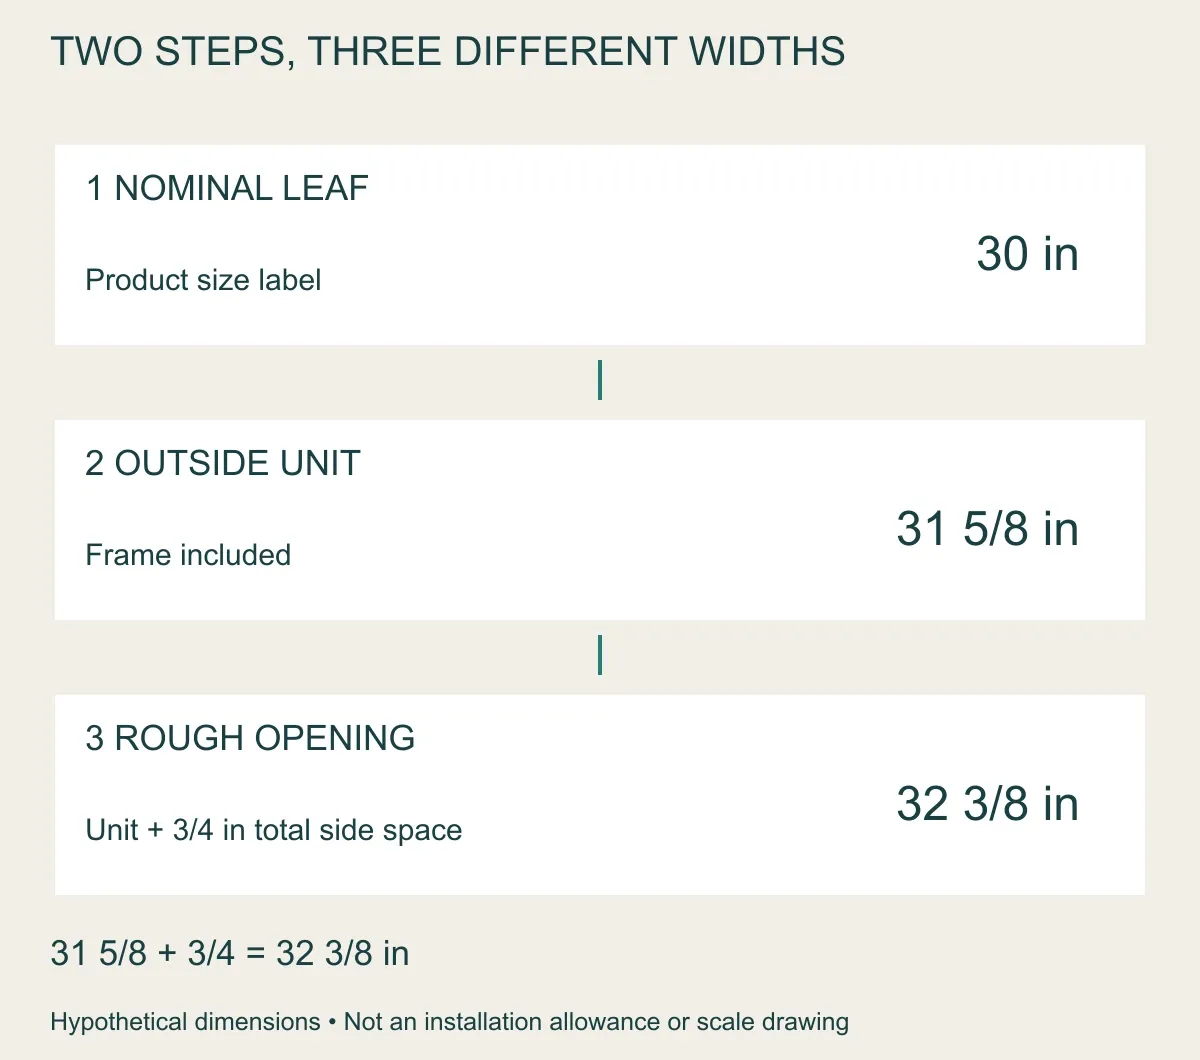
The total difference from the nominal leaf is 2 3/8 in, not the shortcut's 2 in. Both calculations can be internally correct for different assumptions. The error is taking an adder from one system and attaching it to the starting dimension of another.
Suppose the same example's unit measures 82 in from its support base to the outside of its frame head. Adding a stated 1/2 in joint above that head gives an opening height of 82 1/2 in, measured from the same base to the receiving header. That number alone does not say where the room's finished floor is.
These dimensions illustrate the reasoning. For a real assembly, the outside-unit drawing, receiving-opening detail and base level supply the variables.
Why Door Type Changes the Opening
| Arrangement | What Changes |
|---|---|
| Paired hinged doors | Two leaves, their meeting edges and the frame form one assembly |
| Door with sidelights or a transom | Side or top glazing adds to the assembled unit |
| Pocket sliding door | The wall must also contain the space where the panel parks |
| Bifold door | Track, pivots, jamb details and folded panels affect the required opening and passage |
| Surface slider | The panel covers an opening while its track and travel use the wall face |
| Exterior unit | Sill, threshold, support and water-management details affect the base and assembly |
A pocket-door frame cannot be understood as an ordinary single-door frame with the same allowance added. Similarly, a paired door's total leaf width does not reveal the frame's outside width.
An exterior sill is a bottom component of the unit; a sill pan is part of a water-management arrangement beneath or around the base. These are not interchangeable words for finished flooring. Their actual construction determines where height measurements begin.
How to Measure a Rough Opening
A tape measure records distances. A level, straightedge and diagonal checks help describe shape. A sketch or labeled photograph keeps the readings connected to their positions.
1. Establish the Visible Boundaries
Measure the receiving opening, not the decorative casing or the open space inside an existing frame. Casing is trim on the wall face. It can hide the joint and structural edge.
If the old frame conceals the opening, record that limitation. Measuring the visible frame does not reveal a hidden structural dimension.
2. Measure Width in Three Places
Record top, middle and bottom widths between the same receiving faces. Keep all three values.
The narrowest reading can limit where a rectangular unit fits. The larger readings show where more space remains. An average erases both pieces of information.
3. Measure Height from One Defined Base
Record the left and right heights to the underside of the header or defined top edge. A center reading can help where the top or base varies.
State whether the base is bare slab, subfloor, finished flooring or the prepared support for a sill. A height measured from concrete and a unit dimension measured from finished floor are not directly comparable.
4. Check Plumb, Level, Square and Plane
Plumb means vertical. Level means horizontal. Square means corners at right angles. Record the corner-to-corner diagonals, then also check the sides and top with appropriate measuring tools.
Plane describes whether the receiving faces line up as intended. One corner can project forward even when the widths look similar. A bowed side can also intrude between measured corners.
Equal diagonals are useful evidence, but do not reveal every bow, twist or local obstruction. Width and height describe size; these checks describe shape.
Worked Survey: Why All Readings Matter
This hypothetical R-01 survey uses millimeters. The proposed rectangular unit is 960 mm wide and 2140 mm high. The planned finished floor is 20 mm above the slab.
| Measurement | Readings | What the Comparison Shows |
|---|---|---|
| Width, top / middle / bottom | 1000 / 994 / 998 | Remaining total width is 40 / 34 / 38 mm |
| Slab-to-header height, left / right | 2180 / 2176 | The right side has 4 mm less height |
| Height above planned finished floor | 2160 / 2156 | Subtract the same 20 mm floor build-up |
| Head space above the 2140 mm unit | 20 / 16 | Assumes its base sits at that finished-floor level |
| Diagonals, plumb, level and plane | Not yet recorded | The size readings do not establish these conditions |
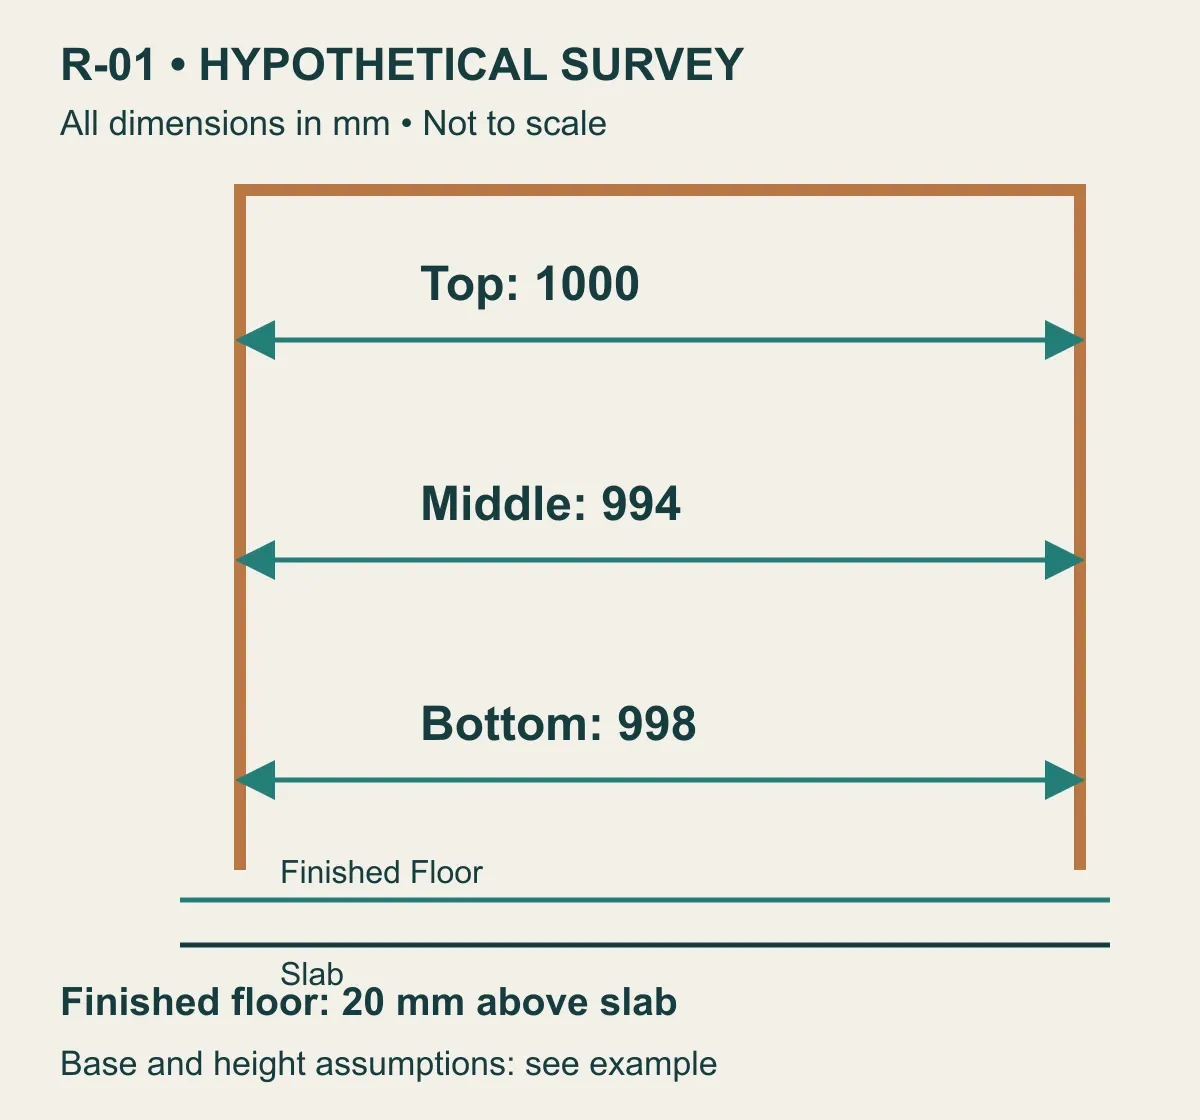
At the middle, 994 − 960 = 34 mm remains across the two sides. A centered frame in the assumed straight geometry would have 17 mm on each side. A real leaning or uneven opening does not necessarily divide the space equally.
For height, the left calculation is 2180 − 20 − 2140 = 20 mm. On the right it is 2176 − 20 − 2140 = 16 mm. Choosing the larger left height would hide the right-hand constraint.
The example does not establish permitted joints. It shows how a measured variation and a floor layer change the available space.
How Finished Flooring Changes the Answer
Adding flooring raises the surface people walk on. If the header does not move, the available height above that surface becomes smaller.
A 20 mm floor build-up can include several layers, such as a substrate, adhesive and finish. For the height comparison, use the complete change in level. Looking only at the visible tile or floorboard can miss part of it.
The unit's support base is a separate question. A sill may sit on a prepared support rather than the top of the room flooring. In that case, relate both levels to a common reference before subtracting the unit height.
Also distinguish frame fit from panel operation. A frame can fit the rough opening while the panel catches on a later floor finish. The panel's bottom clearance and the frame's support detail describe different interfaces.
Common Mistakes and What They Hide
| Mistake | Information Lost |
|---|---|
| Using the leaf size as the receiving opening | The frame and installation joint |
| Measuring casing edge to casing edge | The actual structural boundaries |
| Keeping only the largest width | A narrower point that may restrict fit |
| Keeping only the smallest width | The larger spaces at other positions |
| Mixing slab and finished-floor heights | The thickness of the floor build-up |
| Checking only diagonals | Local bowing, twist and projecting material |
| Assuming trim fixes an oversized opening | The support, fixing and sealing arrangement behind it |
A rubbing panel or uneven gap can have several causes, including hinge position, frame alignment, floor changes or movement in the materials. A symptom alone does not prove that the original rough opening was wrong.
Likewise, covering a wide joint with trim changes its appearance; it does not establish that the frame is adequately supported or fixed. Structural corrections, including changes near the header, require a suitable professional assessment.
Common Questions
What Rough Opening Does a 30-, 32- or 36-Inch Door Need?
Under the limited shortcut illustrated above, the widths are 32, 34 and 38 in. Actual unit systems can require different dimensions. The useful question is which leaf, outside unit and base assumptions the chart uses.
Can I Work Out the Rough Opening from an Installed Door?
You can measure the leaf and visible frame. The structural edge may be concealed, so its location cannot be established by adding a generic allowance to those readings.
Should I Use the Smallest or Largest Measurement?
Keep the whole series and its positions. The minimum can reveal a fit constraint; the maximum helps describe the opposite joint condition. Neither number alone describes a distorted opening.
Is Wall Thickness Part of Rough-Opening Width?
No. Width runs across the doorway. Wall thickness runs through the wall and affects the frame's depth and profile. The Jamb-Depth Guide explains that separate direction.
For a drawing with many openings, record the measurements beside their marks. The Door-Schedule Guide shows how those marks connect the plan, dimensions and details.